Monday, February 27, 2012
Teaching Charity Without Being Pushy.
I am all about charity and giving in my personal life, but when it comes to teaching kids about giving its not easy. For my scouts this year we are going to be doing our service project through AnySailor.com. Since we live in a Navy area I thought this would be fitting, mostly because there are many in the Navy from here and other places serving overseas in combat areas. Any Sailor is pretty easy to go through. First you read through the units that have posted and see who they are and what they need. Then you pick the unit that you want and request their detailed information. Once you have collected the things for them you send them to the address provided. Tonight we will be collecting the donations for the unit and the girls will be drawing pictures to add to the care package. When we get done with our meeting this evening I will scan in their art work so that all of you readers can see their ways of giving!
Thursday, February 23, 2012
Twisting away again...Working with grapevine!
Every year a wonderful time comes around when my Dad prunes the grape arbors, and I reap the benefits! I love working with grapevine, as a weaving material it is wonderful! This year I am going to make baskets as well as wreaths. Today though I wanted to share how to make a grapevine wreath with all of you! You can find grapevine all over, growing wild mostly. Most home owners see it as a weed, so ask if you can cut it from their yard, or if you know someone who grows grapes ask if you can have the cuttings after they prune! Here you go readers, have fun! Hopefully we will start hearing from Sarah soon, she is semi settled and has started her new job as a farmer girl!
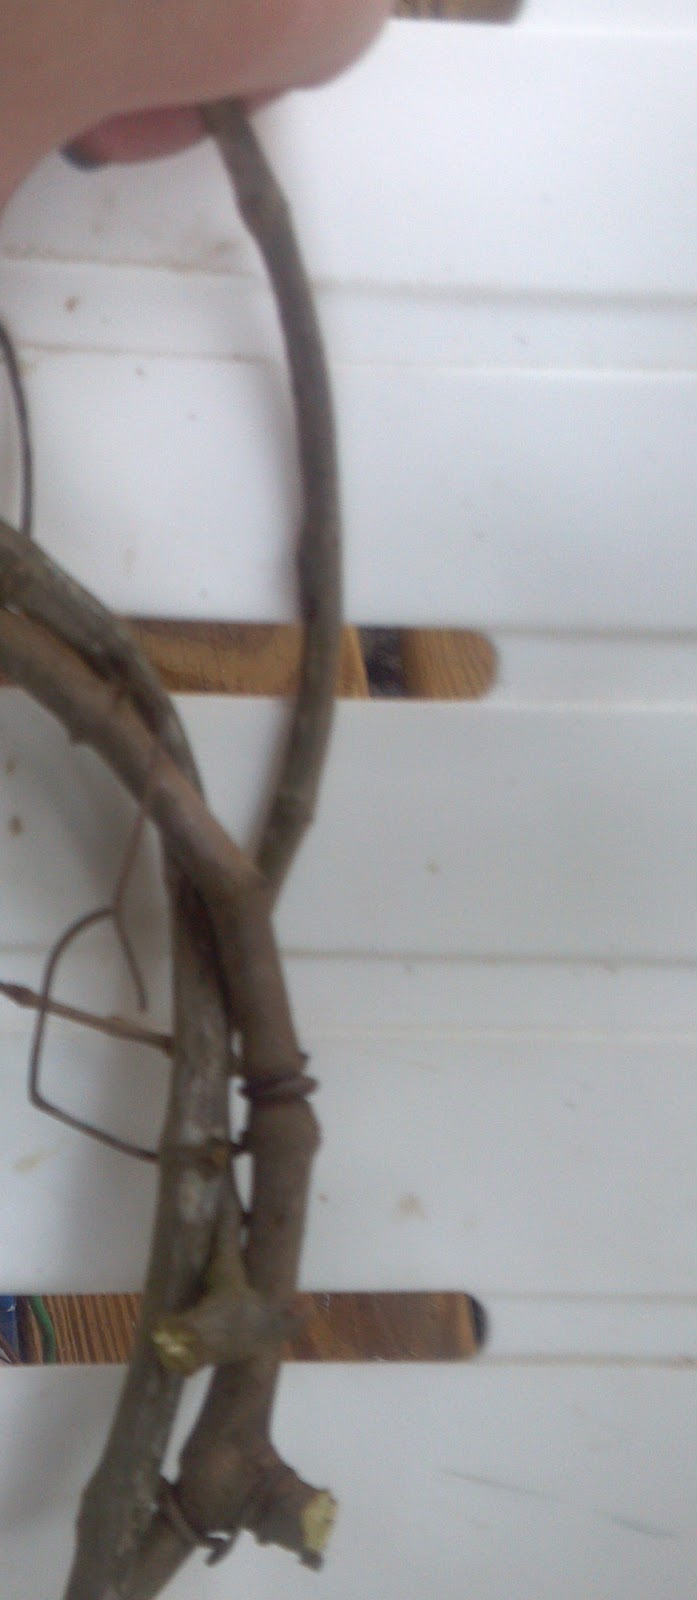
Step one: Start with a decent sized vine that can be made into a circle longer than the size you want the wreath.

 Step Three: Add another vine. Start it by tucking the thick end of the vine into an open area of the knotted first loop.


 Step Five: Continue adding vines until your desired width is reached. You can go the same direction as you add each vine or you can go the opposite direction each time. I personally prefer to add each opposite, it seems to make them stronger. Tuck the last end securely, and you will have a wreath that will last years to come.

Step one: Start with a decent sized vine that can be made into a circle longer than the size you want the wreath.

Step Two: Make a circle with the vine tucking the ends like you would start tying a knot.

Step Four: Wrap the vine around and around the original loop taking care to hold down the ends so they do not slip out. Tuck the end into a open gap.


Wednesday, February 15, 2012
Sew excited!
Hehehehe, see what I did there?? Did ya??? Today I found out that there is a JoAnns in Brunswick, GA that just had their grand opening. For those of you who don't know what JoAnn's is, its a fabric and craft store. I have been limited on the fabric and pattern front around here, especially for plus sized patterns for myself. Now, with this excitement you dear readers will begin seeing my toddler steps toward sewing my own clothes, since I can't ever seem to find anything I like in the regular stores! See you guys soon! Hopefully there will be pictures of popping plants!
Monday, February 13, 2012
As The Garden Grows!

Monday, February 6, 2012
New toys!!!! And SLIME!
This weekend my husband and I bought our new washer and dryer. A lot of people probably don't see a big deal with that, but we do! This is the fist new set we have ever bought in our almost 6 years of marriage!!!! They are so amazingly quiet, I almost forget that they are on! Here is a picture of the pretty's!

Here is a fun activity to go with the little ones in your life! Last Monday my girl scout troop made slime, I love this stuff! Once it gets done it lasts forever and cleans up off of anything! Here is how to make it!
You will need:
Elmer's White Glue
Borax Powder
Food Coloring
Water
Ziploc bags both for mixing and for storing the slime.
Here is a link to the actual recipe http://chemistry.about.com/od/chemistryactivities/ss/slimerecipe.htm
I did make a couple of changes to the how to, like we used Ziploc bags instead of bowls to mix the slime, it cut down on the mess by a ton and with 6 girls doing the same activity lack of mess was a good thing. I also premixed the water and glue, and borax and water. Sorry there are no pictures of the girls actually making the slime, but I was going around helping each of them.

The table where I had everything set up.

The Glue and water mixture.

Food Coloring

This is what I had the borax and water mix in.
Sunday, February 5, 2012
Pro*CRAFT*ination
No, I don't have a lisp, I have a procrastination problem, and it involves a lot of crafting. Now before everyone starts lecturing me (mother), let me defend myself, as much as I can.
Although I know that my move is looming on the horizon (holy crap 5 days to pack!), the inevitable sifting through my belongings rakes up a multitude of lost and unfinished projects that beg to be addressed. Usually while enjoying a nice film, or an episode of Downton Abbey (anyone else obsessed!?) Some of what you will see here today were already completed projects; some were projects to give to folks before my departure. So although my time could have been better spent (in my defense, most of these were projects I took to work), they did accomplish one thing: They freed up valuable space. They also rock, but that's irrelevant.
And so, I bring you: The Already-Finished Projects That I've Probably Moved 500 Miles
I don't know if I've mentioned it before, but my friend and co-worker has pretty much the cutest baby on the planet. I'm kind of sad we aren't related, so that if something catastrophic happened, I might possibly receive custody of this giggly, smiley small person. Darn the bad luck. Anyway, said child has become the dumping ground for all my baby-nesting projects, as I am childless but still can't stop myself from making some of the adorable baby accoutrements I see. I think her mom is ok with it. And so, as I was sifting through the stuff still in my former-roommate's basement, I found these babies that I made while living in Virginia (2 years ago, cough cough...), when I re-discovered knitting. First, is the watermelon hat.
.JPG)
They kind of remind me of a 20's turban. They're super-easy to make. You literally knit a rectangle long enough to go around your head (you can make it as wide or as skinny as you want it.) After you bind off, you sew the ends together, overlapped, and then pull the yarn to gather it. Then you just wrap some extra yarn around it to cover the join. I think this one took under 2 hours once I finally picked it back up. I made two for myself over Christmas, and I finished each one while watching one of the last installments of Harry Potter.
Although I know that my move is looming on the horizon (holy crap 5 days to pack!), the inevitable sifting through my belongings rakes up a multitude of lost and unfinished projects that beg to be addressed. Usually while enjoying a nice film, or an episode of Downton Abbey (anyone else obsessed!?) Some of what you will see here today were already completed projects; some were projects to give to folks before my departure. So although my time could have been better spent (in my defense, most of these were projects I took to work), they did accomplish one thing: They freed up valuable space. They also rock, but that's irrelevant.
And so, I bring you: The Already-Finished Projects That I've Probably Moved 500 Miles
I don't know if I've mentioned it before, but my friend and co-worker has pretty much the cutest baby on the planet. I'm kind of sad we aren't related, so that if something catastrophic happened, I might possibly receive custody of this giggly, smiley small person. Darn the bad luck. Anyway, said child has become the dumping ground for all my baby-nesting projects, as I am childless but still can't stop myself from making some of the adorable baby accoutrements I see. I think her mom is ok with it. And so, as I was sifting through the stuff still in my former-roommate's basement, I found these babies that I made while living in Virginia (2 years ago, cough cough...), when I re-discovered knitting. First, is the watermelon hat.
.JPG) | |||
| I have no idea why this is sideways. |
Can we get a collective "Ahhhhh"? I can't wait to see this on a sweet baby noggin. Nothing cuter than children dressed like fruits. Which leads us to this:
.JPG)
This was originally supposed to be a lime, and was my first stranded knitting project, but honestly, it could be a lime, a turtle, or the outside of the watermelon to my over-imaginative mind. Whatever you think it is, I'm sure the baby will make it look cuter.
A non-baby project that I had sitting around will hopefully fulfill a friend's need for a brooch (if we ever get together, agh!) I made this like a year and a half ago, but hopefully it will fit in with her shabby-chic aesthetic.
.JPG) | |
| If not, haha sucker, it's a handmade gift and now you'll have to keep it forever! |
And so we move along to Projects Whose Parts Were Finished, But Not Completely Assembled (isn't that life?) I'm pretty sure I also made these in Virginia, 2 years and 500 miles ago. It was supposed to be stuffed with a foam cube, but I really just wanted it to be in chubby baby hands asap, so it's stuffed with fiber-fill, and as such is not square in the slightest, but I'm sure the baby won't critique my lack of geometry skills.
.JPG) |
| In fact, I'm pretty sure she'll just slobber on it. |
Each side is a different pattern, which was great for learning new stitches. There's a purple, red, and green side that you can't see. Not that I don't love my friend, but I can't wait until babe is chucking this at her :-)
Which brings us to the final project of the night, Things That I Had Just Barely Started But Should Probably Finish Before I Leave: a headband for my roomie. She's a brave woman, and actually goes outside to exercise (run, what is that?) so I thought she could use one of these to keep her ears warm. Except that it hasn't really gotten cold this year. But whatevs, I started it before I realized this was going to be eternal fall. There's always next year. These are a good way to keep your ears warm without looking entirely like a snowman. Hopefully a little more stylish.
.JPG) |
| You can also see that I have packed nothing in my office. |
.JPG) | |
| A better view. And yes, mom, I know my hair is a mess. I promise I fixed it after I saw this picture. |
And there you have it folks. Moving is a process. And for me, it's achingly slow. But I also accomplish a lot in my efforts to not have to pack as much junk. Best of luck to you all as you do your spring cleaning, moving, etc. May many projects finally be finished!
~Sarah
Friday, February 3, 2012
Mooooooving!
Hey every body! I am indeed moving to DC (or more correctly, Maryland) next weekend, so please forgive my spotty posting for the next little bit. I should get it done, but cut me some slack! There hasn't been a whole lot of packing going on yet, as I am still whittling down my belongings to what I *actually* need and want. Luckily, I've had a great helper.
 I have a post for tonight, but then I realized it was all about surprise gifts that I'm delivering tomorrow (yes, it's still Christmas around here!) Bear with me as I distribute my goods, and I'll post them all here this weekend!
Today, I did receive my order from Baker Creek Heirloom Seed Company. They're so lovely!
 And I got a free packet too! Can't tell you what it is, because it's one of those pesky leftover Christmas presents I have going ;-) I was highly tickled that my invoice was signed by this guy

and the farm that I'll be working at is called Claude M(oore) too! Hilarious!
If you want to know more about my job, check out this post on my personal blog! It's definitely worth it!
Until this weekend,
~Sarah

Today, I did receive my order from Baker Creek Heirloom Seed Company. They're so lovely!


and the farm that I'll be working at is called Claude M(oore) too! Hilarious!
If you want to know more about my job, check out this post on my personal blog! It's definitely worth it!
Until this weekend,
~Sarah
Wednesday, February 1, 2012
Orange Marmalade aftermath... Orange Extract.
After we got finished making our half a ton of orange marmalade we still had a ton of peels left over. So I went a googling to see how to make orange extract out of the left overs! I was in luck there is a whole how to on the Live Strong website. Here is the link if you would like to try it yourself using their precise instructions. http://www.livestrong.com/article/354088-how-to-extract-oil-from-the-skin-of-oranges/ Here is my how to, its a little less scientific.
What you will need:
Orange Peel
Mason Jar with lid and ring
Vodka
Step 1: Put cut up orange skins on a sunny shelf for a couple of hours to dry them.
Step 2: When peels are decently dry put them in a food processor until they turn into a dry paste like consistency. It will look something like this.
 Step 3: Put the orange paste into a clear mason jar.
Step 4: Pour in vodka until the orange is just covered. Seal jar and shake.
Step 5: Put jar near a sunny window for 3 days, shake at least 2 times a day.

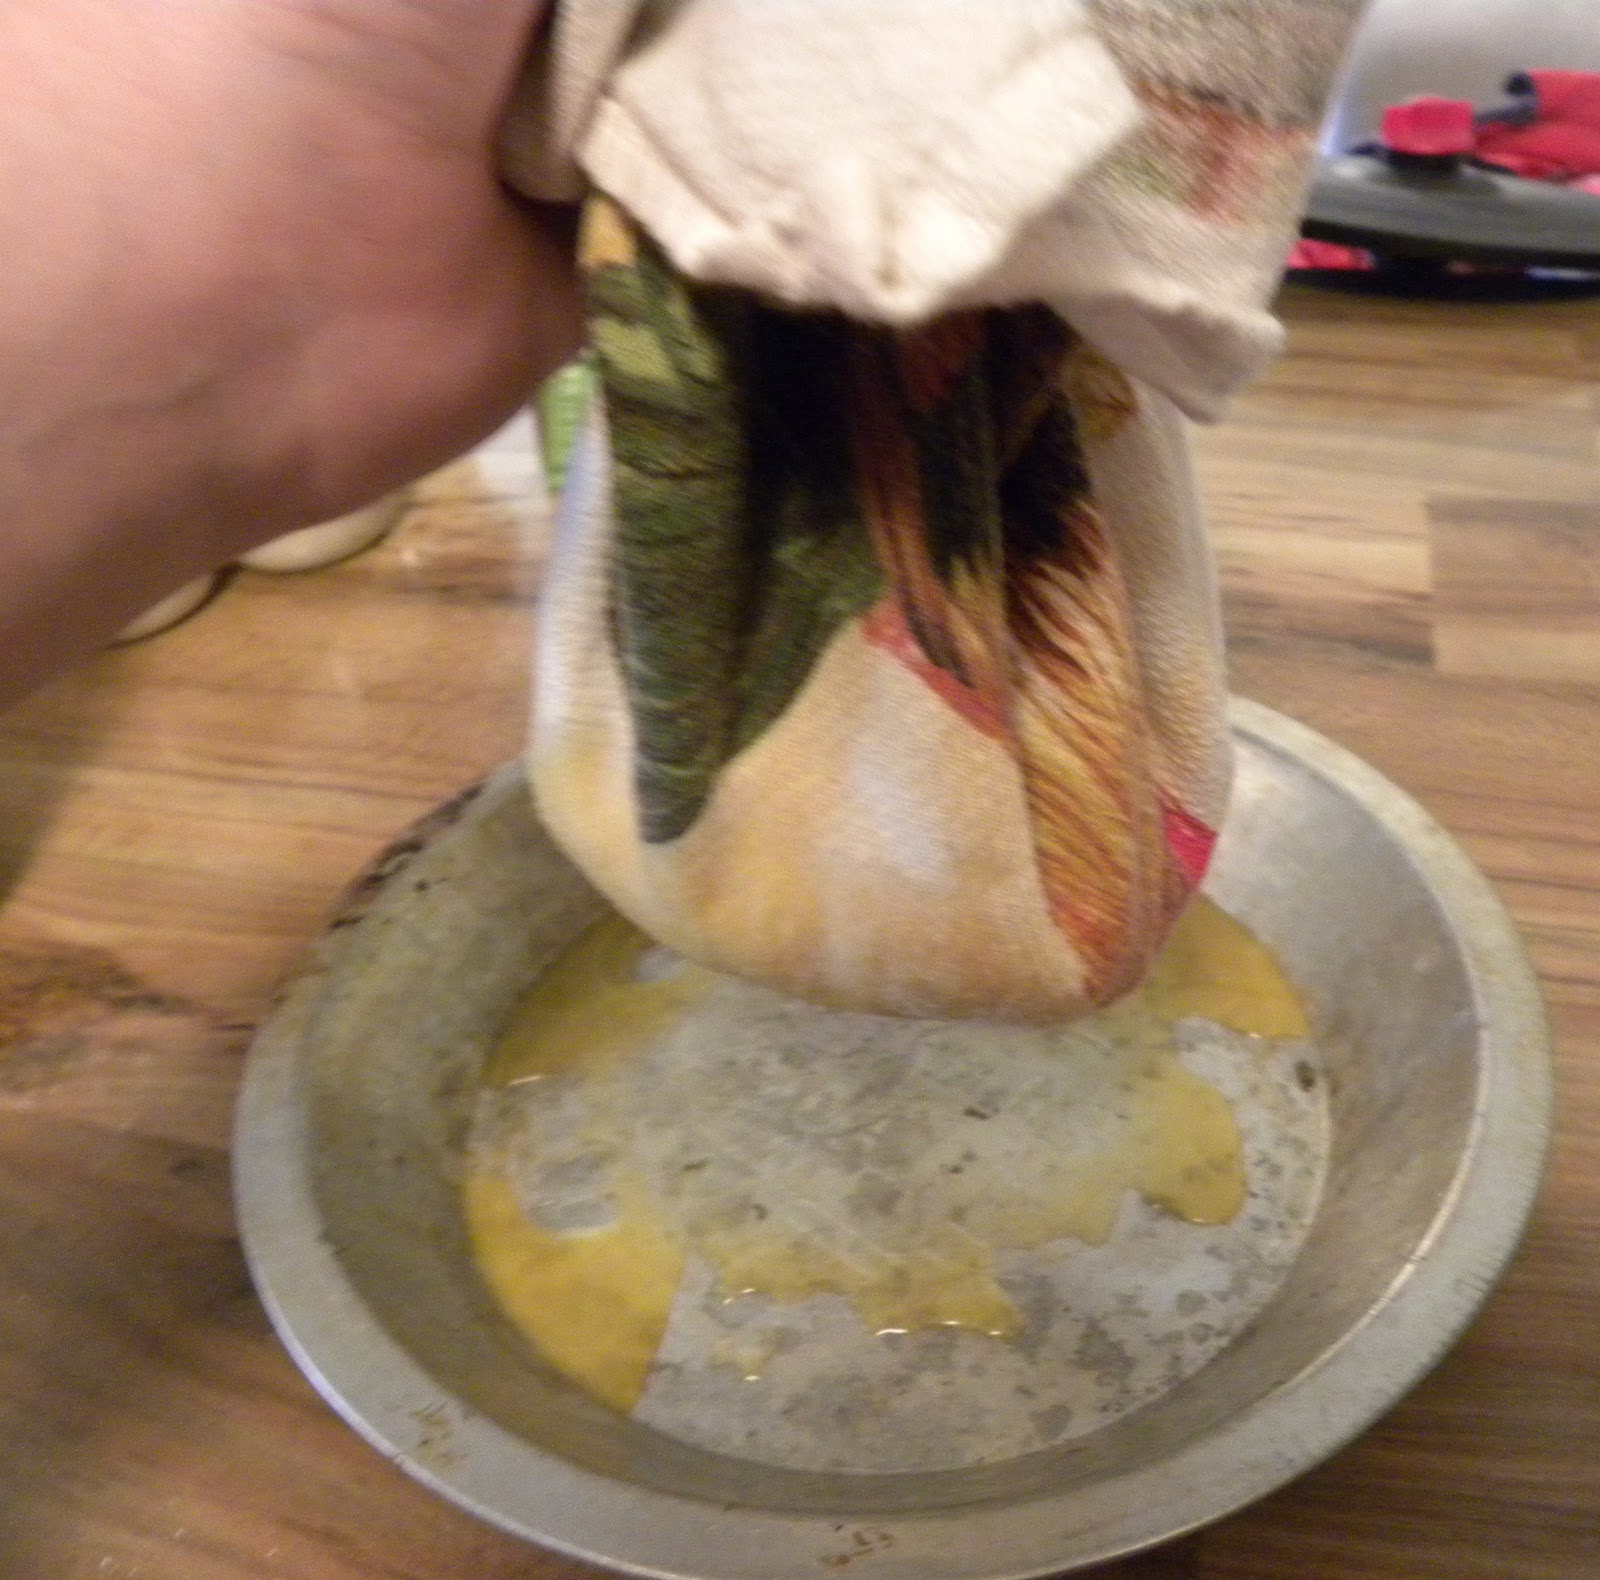
Step 5: Strain out the peel using a cloth so that the liquid goes into a shallow pan. I just used a thin dish towel.
 Step 6: Allow the liquid to sit for at least 12 hours so that the alcohol evaporates. Here is a series of photos to show how it looks throughout the 12 hours.

Step 7: Restrain liquid to remove any chunks that might have gotten into the extract, I used a coffee filter.
 Step 8: Pour into a seal able container and store in a dark area. I found this container at Michaels for 99 cent! Isn't it a lovely color!!! I had a little bit left in the container that I strained it in so I rubbed it all over my hands, they are so soft now!

While on the live strong site I found a page about purposes for orange oil here it is! I hope that some of you readers out there try it. Let us know how yours turns out! http://www.livestrong.com/article/185636-purpose-of-orange-oil/
What you will need:
Orange Peel
Mason Jar with lid and ring
Vodka
Step 1: Put cut up orange skins on a sunny shelf for a couple of hours to dry them.
Step 2: When peels are decently dry put them in a food processor until they turn into a dry paste like consistency. It will look something like this.

Step 4: Pour in vodka until the orange is just covered. Seal jar and shake.
Step 5: Put jar near a sunny window for 3 days, shake at least 2 times a day.

Step 5: Strain out the peel using a cloth so that the liquid goes into a shallow pan. I just used a thin dish towel.

Step 7: Restrain liquid to remove any chunks that might have gotten into the extract, I used a coffee filter.


While on the live strong site I found a page about purposes for orange oil here it is! I hope that some of you readers out there try it. Let us know how yours turns out! http://www.livestrong.com/article/185636-purpose-of-orange-oil/
Subscribe to:
Posts (Atom)